ブログ
Electronics Equipment
日本語版
Most of our products require some user assembly. In general, through-the-hole components must be soldered on, whereas small pitch surface mount components come pre-soldered.
If you are just getting started with soldering, you might wonder what kind of equipment is required. To this end we have supplied a list of essential equipment as well as nice to have equipment.
If you are a beginner we recommend this guide:Beginners Guide To Soldering.
Essential Equipment
This is a list of equipment you must have before you are able to assemble our products.
Soldering iron

There are two basic kinds of soldering iron available: Standalone and Soldering Station.
For a beginner looking to solder through the hole components, just about any standard soldering iron with a power rating between 15 and 45 watts will work. Don't get one with that is too powerful, it might burn the PCB and the components.
When you buy a soldering iron, it usually comes with a tip installed. In general a chisel type tip is easiest to use for through the hole soldering, but a round tip is also fine. It doesn't need to be super tiny: The width of the solder you use is more important than tip size. A stand is not usually included, so we recommend buying one separately so you have a safe place to put the iron when you are not using it.
A normal solder iron has the power cable directly attached: Just plug it in and wait. A stand and a sponge is usually not included with a basic soldering iron, so you will need to factor this into the cost.
If you are willing to invest a bit more, you will want to go for a soldering station. A soldering station allows you to adjust the temperature of the tip to match the kind of soldering you are doing. If you plan to learn how to do surface mount soldering (it is not as difficult as it looks!), then a soldering station is essential.
A soldering station is usually also much faster than a standalone soldering iron, and it will become warm enough to use almost immediately after turning it on. Also, a stand and sometimes also a sponge is usually included, so be sure to take this into account if you go for a basic iron, as this does not usually include extras.
Soldering stations from Hakko are very popular with hobbyists and the basic models are quite affordable.
If you plan to use lead free solder, be sure to get a soldering iron or soldering station that is marked as "lead free solder compatible"
Solder

There are two basic parameters to choose from when selecting solder: Leaded and lead free.
We like to use lead free solder, it is better for the environment and probably better for your own helf also. Although, to be fair, unless you solder for a living you probably don't need to be overly concerned with the health benefits of lead free solder.
Lead free solder does not flow as well as leaded solder, so it is a bit more difficult to get started with. Also, higher temperature is usually required, so it is easier to use with a soldering station.
Leaded solder is easier to work with, so most beginners choose it.
When chosing solder it is essential that you get solder with a flux core. Solder comes in various wire thickness: 0.8 or 0.6 mm is a good choice for through the hole soldering. If you want to do surface mount soldering, 0.4mm is a better choice.
Desoldering wick

Deoldering wick is essential for when you make small mistakes such as accidentally bridging two solder points. Just place it over the excess solder and apply the soldering tip on top. Be sure to remove it toegether with the solder iron or it might stick to the PCB.
Solder sucker

If you want to remove through the hole components, just a solder wick alone is usually not enough. You will need a solder sucker to remove any solder inside the solder hole.
Even with a solder sucker through the hole components can be difficult to remove cleanly, so pay close attention to the instructions of the item you are assembling to avoid simple mistakes such as misplacing components or placing components backwards or upside down.
Sponge

You will need a sponge to clean off excess solder from the tip. Be sure to moisten it in water before use.
It is also possible to use brass "sponge". It works about the same but you don't need to moisten it before use (in fact, you definitely shouldn't). Which one to use is up to personal preference
Multimeter

A reasonable multimeter is absolutely essential. It can be a relatively cheap one: one with digital readout is usually easier to use. As a bare minimum it should allow voltage, current and continuity testing.
An autoranging meter is probably the easiest to get started with, but a manual one will do to. Some people prefer the manual ones because they are much faster to give readings.
Wire clippers
You will need wire clippers to clip off excess wire from solder joints.
Be sure to get wire clippers with the back end completely flat: This will allow you to clip wires as close to the soldering point as possible.
Protective glasses
It is highly recommended to always wear protective glasses when soldering: Especially when cutting wires. Fragments can fly at surprisingly fast speeds when clipping off wires, you definately don't want to get something like that in your eyes!
Recommended Equipment
You will be able to perform basic soldering with just the equipment listed above, but the stuff listed below will make your life much easier.
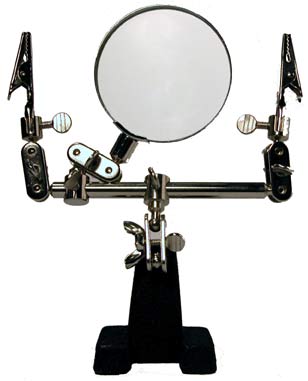
Helping hands or vise

It is useful to have something to use to hold the pcb securely in place while soldering. Helping hands are perfect for this. If you have the space on your desk a securely fastened vise is even better.
Pinchers

Pinchers are great for pulling wires through holes and for placing small components. A reasonably good quality one really pays off. Straight or angled are both fine.
Clips

Note: Helping hands usually come with two clips that can be detached.
A set of clips to hold components in place before soldering them is useful. This is especially good for soldering pin headers and other low profile components
Masking tape

Narrow masking tape is nice to have. Use it to temporarily hold down components where using clips would be troublesome.
Wire strippers

A wire cutter can be used to strip insulation off wires. For simplicity, a dedicated wire stripper can be used to effortlessly strip off wire insulation.
